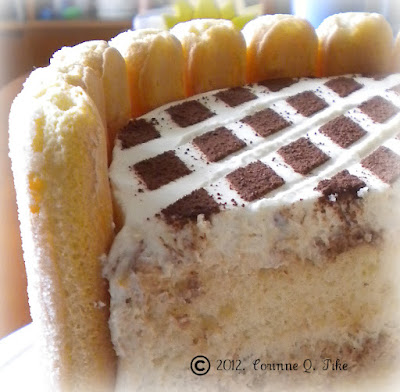
How do you like your TIRAMISU?
With alcohol or no alcohol?
With plain/white, chocolate or mocha cake as base or with ladyfingers?
Do you have issues about having raw eggs in the filling/frosting (as traditional tiramisu cakes do)?
If you prefer a non-alcoholic white cake, and no raw eggs, my version of this cake might just be the one for you!
Isn't that just beautiful? Bet this would cost a fortune in a bakeshop!
While I aimed to make the cake completely alcohol-free, I later found out that both my chocolate and coffee extracts contained some alcohol. They are with such small amounts though that using them rendered no alcohol taste and/or smell on the cake. It turned out just the way I liked it. Simply gorgeous, very light, not too sweet, with just the right coffee flavour.
Want to make it yourself?
Here's how.
(Nearly) NO-ALCOHOL TIRAMISU CAKE
For the chiffon: (you will need two 8" round, 3" high or two 9" round, 2" high aluminium cake pans)
{A}
2 1/4 cups sifted cake flour
3 teaspoons baking powder
1 teaspoon salt
3/4 cup white sugar
{B}
1/2 cup corn/canola oil
7 egg yolks, from large eggs, at room temperature
2/3 cup water
1 teaspoon vanilla extract
1/2 teaspoon almond extract
{C}
7 eggwhites
1/2 teaspoon cream of tartar
{D}
3/4 cup white sugar
Procedure:
1. Preheat oven to 175 degrees Celsius. Prepare your pans by lining the bottoms with baking/parchment paper. Leave them ungreased. DO NOT USE NON-STICK PANS.
2. In a large bowl, combine {A} well. Add in {B}. Beat with electric mixer or by hand until smooth and well blended.
3. In a separate bowl, beat {C} on high speed until frothy. Gradually add in the sugar {D} and beat until stiff peaks are formed. Gradually and gently fold in egg whites into egg yolk mixture. Divide batter equally onto your two pans.
4. Bake for about 55 minutes or until top springs back when lightly touched. Invert pans into wire racks immediately and cool completely.
5. To release cakes from pans, carefully run a thin knife around sides of the pans and invert cakes to release. **Tip: For easier handling, wrap your cakes very well in cling film, then refrigerate overnight before frosting.
For the coffee syrup:
1/2 cup water
1/4 cup white sugar
1 tablespoon espresso coffee granules/powder
1 teaspoon chocolate extract
Combine water, sugar, and coffee in a small saucepan. Over low to medium heat, bring to a boil, mixing constantly until sugar and coffee are dissolved completely. Remove from heat then stir in the chocolate extract. Set aside to cool.
For the mascarpone filling/frosting:
250g tub of mascarpone cheese, room temperature
2 cups chilled thickened/heavy cream
1/2 cup white sugar
1 teaspoon coffee extract
Using chilled bowl and beaters, whip together the thickened cream, sugar and coffee extract until stiff. Fold in the mascarpone cheese until well combined.
TO ASSEMBLE THE CAKE:
You will also need:
about 1/2 - 1 cup unsweetened cocoa powder
sponge (lady) fingers or savoiardi biscuits, about 24-30 (depending on size of biscuits and cake)
ribbon (optional)
1. Cut the two cakes horizontally in half. (We only need three layers, so set aside one of the top layers for snacking later).
2. Place one bottom layer, cut side up on your cake board. Brush the entire surface with coffee syrup. Be careful not to over soak your cake. On the other hand, do not scrimp on the syrup too as you will not get enough of the coffee flavour.
3. Spread about a 1/4" thick mascarpone filling evenly over your cake layer. Dust some cocoa powder over the filling then top with your second cake layer (cut side down, top of cake up).
4. Brush coffee syrup, spread filling, and dust cocoa powder as before. Top with the last cake layer (cut side down, bottom side up).
5. Again, brush surface with coffee syrup, then spread remaining frosting on top and sides of the cake.
6. Dust cocoa powder over the cake top. (I used a lattice stencil to achieve the pattern in my cake. Nicer finish, but not necessary). Stick the lady fingers around the cake sides. Tie a ribbon around if you like.
There you go! A great, special occasion cake right from your own kitchen. That wasn't too hard, was it?
Enjoy! Have a blessed Easter!


Tidak ada komentar:
Posting Komentar