I am happy to say I have found an easier way to make the zippered pouch. While the whole process is only slightly modified, I have eliminated a couple of steps and have also done away with the need for a zipper foot! These were made possible, firstly, by using the same fabric for the outer bag and the lining and secondly, by using a slightly longer zipper.
For inspiration, here are the zippered wristlets I have been working on these past few days.
Want to try it?
How to make a Zippered Wristlet/Pouch
To make a fully-lined 5" x 7" zippered wristlet/pouch, you will need:
2 pieces of 11 1/4" (L) x 7 1/2" (W) fabric of your choice (preferably with non-directional prints)2 pieces of 11 1/4" (L) x 7 1/2" (W) suitable fusible interfacing
1 10" all-purpose zipper in a coordinating colour
matching thread
for the optional strap: small swivel hook, 14" (L) x 1 1/2" (W) strip in the same fabric as pouch, 13 1/2" x 1 1/2" suitable fusible interfacing
Procedure:
1. Fuse your interfacing to your fabrics.
2. Fold one of your 11 1/4" x 7 1/2" fabrics in half, right and short sides together. Press well on the fold.
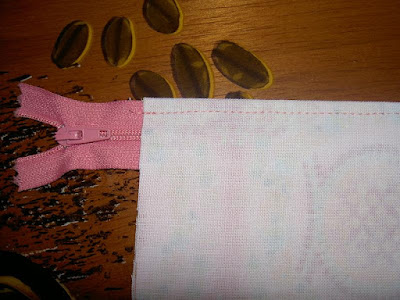
3. Insert your zipper inside your folded fabric in the manner shown in the photo below. Pin zipper in place.

Zipper is right side up with zipper pull on the left side. Fabric is centered between the ends of the zipper.
4. Stitch zipper to the fabric, approximately 1/4" from the fold.

Place your needle position at its leftmost. As you can see from the photo, the left edge of your basic presser foot is side by side with your zipper teeth. This way, you are actually using the zipper teeth as a guide to stitching straight.
5. Open your folded fabric to its right side. Press well away from where you had stitched the fabric to the zipper.
6. Fold your other 11 1/4" x 7 1/2" fabric in half, again right and short sides together. Press well on the fold. Insert the free edge of your zipper on the fold, again with its right side up and the zipper pull on the left. Align the left and right edges of your fabrics. Pin in place.

You should now have four layers of fabric.
7. Stitch zipper to second fabric in the same manner as in step 4.
8. As in step 5, open your second fabric to its right side and press well away from the zipper.

You will now have two layers of fabric on each side of your zipper. Optional topstitching can be done as indicated by the broken red lines.
9. Open your zipper at least halfway. With right sides facing, bring together the top layer of fabrics on each side of the zipper. Move these to one side. This will become your outer bag.
Do the same for the two bottom layers. Move these to the opposite side. This will be your lining.
Pin the fabrics in place. The zipper should naturally fold towards the lining side. Start pinning near the zipper, making sure your seams are aligned.

10. Starting from the center, stitch all around using a 1/4" seam allowance. Leave a 3-4" gap in the lining bottom. Cut off the excess zipper and clip the corners.

Tips: 1) When you get to the lining bottom, increase your seam allowance slightly (by about 1/8"). This will make your lining nice and neat inside your pouch. 2) As you will be cutting off the excess zipper, backstitch a few times over the zipper ends for extra strength.
11. Turn your bag inside out by first pulling out the outer bag through the zipper opening and then out the lining opening. Push the corners out well. It is good to press your bag at this point.

12. Slipstitch the opening closed. Push the lining inside the pouch.
Your zippered pouch is now done!
Zippered pouch outside with detachable strap

Really neat inside

Optional detachable strap
1. Center the interfacing in your 14" x 1 1/2" fabric strip such that 1/4" of fabric is not interfaced on both the short sides.
2. Fold the long edges towards the center. Fold again lengthwise to end up with a 3/8" wide strap. Stitch all around close to the edges.
3. Slip the swivel hook inside the strap. Bring the raw edges together and stitch 1/4" from the edge.

4. Turn the strap over such that the seams on the side you just stitched are now in the inner loop of the strap.

5. Slide the swivel hook over to the stitched side. Stitch across the strap to hold the swivel hook in place. Backstitch several times.

You can attach the hook directly to the zipper pull or you can use a d-ring strap attachment, as shown below, to attach your strap to your pouch.

UPDATED (8/8/08): How to do the d-ring strap attachment
You will need: 2" (H) x 3" (W) strip of fabric, 3/4" d-ring (or key ring)
1. Fold your fabric strip, shorter sides towards the center. Fold again lengthwise to end up with a 3/4" wide strap. Stitch down close to the edges.
2. Slip your strap into your d-ring then bring the raw edges together.
3. After completing step 8 in the main tutorial, pin and baste your strap attachment to your pouch, as shown in the photo below.

 4. Proceed to the rest of steps in the main tutorial.Once again, I do hope the tutorial was clear enough to follow. Ask away if you have any questions. I am having so much fun making these....wish you will, too!


Tidak ada komentar:
Posting Komentar