Kamis, 31 Maret 2011

Mocha Chiffon Cake

Another cake done, this one for a 70th birthday.  I wanted to decorate the cake with something special, something I've never tried before.  Thought a fondant bow would be nice.


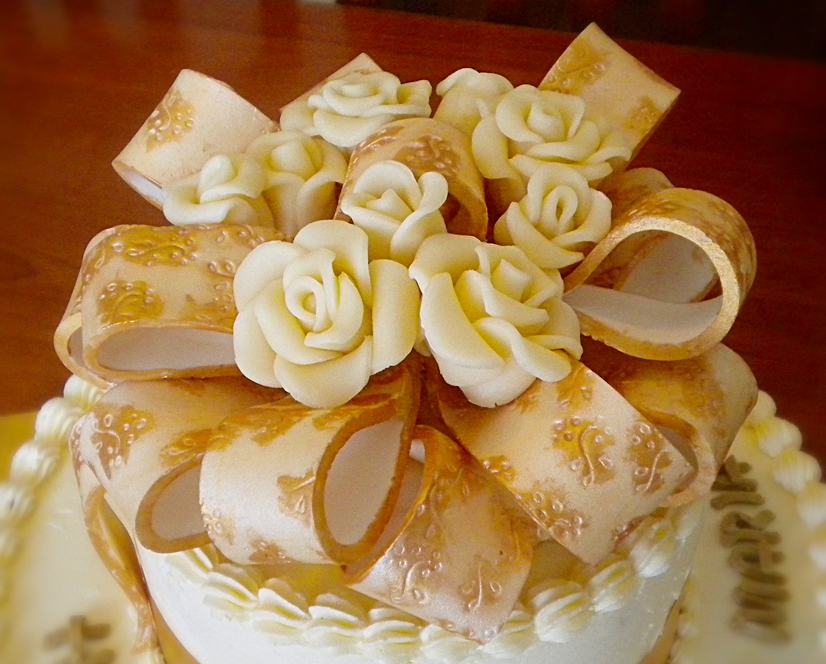
With the help of this tutorial, I came up with this gumpaste bow to use as my topper.  To achieve this particular look, I embossed some embroidery prints on the gumpaste then brushed it with gold shimmer dust before cutting the strips for the loops.  After each loop had dried, I thought of experimenting by painting over the prints with antique gold edible paint.  That made the prints stand out more, don't you think?

I had a bit of trouble assembling the loops though.  I used royal icing at first to "glue" them altogether but even after a day, the royal icing remained soft.  Rather than take the risk of it not hardening, I took the bow apart again, cleaned off the royal icing and used melted white chocolate instead.  It ended up kinda messy around the center...and that explains why I decided to add some roses.  They're there to conceal the mess.

The final cake is a two-tiered (6" and 10") mocha chiffon frosted and filled with Swiss Meringue Buttercream.  I may have rolled out my gumpaste a little too thick because my bow was quite heavy.  I had to put it on top of a small cardboard round supported with straws underneath.


Speaking of mocha chiffon...I've been getting tons of emails requesting for a copy of the recipe I use.  Instead of emailing them one by one, here it is now for everybody's convenience.  For frosting, I usually make Swiss Meringue Buttercream but you can use any buttercream recipe of your choice.  Add a bit of coffee dissolved in a little boiling water to make your frosting mocha flavoured as well.

Enjoy!

MOCHA CHIFFON CAKE (recipe suitable for an 8” round, 3” high pan)

{A}
1 cup plus 2 tablespoons sifted cake flour
1 ½ teaspoons baking powder
½ teaspoon salt
6 tablespoons white sugar for egg yolks
{B}
¼ cup corn/canola oil
4 egg yolks, from large eggs, at room temperature
6 tablespoons water*
2 teaspoons coffee powder*
½ teaspoon vanilla extract
{C}
4 egg whites
¼ teaspoon cream of tartar
{D}
6 tablespoons white sugar for egg whites
*dissolve the coffee in a little boiling water, then top up to have a total of 6 tablespoons of water/coffee mixture.

Procedure:
1. Preheat oven to 175 degrees Celsius.
2. In a large bowl, combine {A} well. Add in {B}. Beat with electric mixer or by hand until smooth and well blended.
3. In a separate bowl, beat {C} on high speed until frothy. Gradually add in the sugar {D} and beat until stiff peaks are formed. Gradually and gently fold in egg whites into egg yolk mixture. Pour batter into an ungreased 8” round, 3” high pan.
4. Bake for about 55 minutes or until top springs back when lightly touched. Invert pan into wire rack immediately and cool completely.
5. To release cake from pan, carefully run a thin knife around sides of pan and invert cake onto a cake board. 
6. Cut cake in half horizontally.  Fill and frost with buttercream and decorate as desired.

SWISS MERINGUE BUTTERCREAM (adapted from Shelly Kaldunski's Cupcakes book)

3 egg whites
¾ cup sugar
Pinch of salt
1 cup unsalted butter, room temperature, cut into small pieces
1 teaspoon vanilla extract

In a large, clean heatproof bowl, combine the eggwhites and sugar. Set the bowl over (but not touching) simmering water in a saucepan and heat the mixture, whisking constantly, until the sugar has completely dissolved and the mixture is very warm to the touch (about 160 degrees F on an instant-read thermometer), about 2 minutes. Remove the bowl from the saucepan.

Using an electric mixer on high speed, beat the eggwhite mixture until it is fluffy, cooled to room temperature, and holds stiff peaks (the mixture should not look dry), about 6 minutes.

With the mixer on medium-low speed, add the salt and the butter, a few pieces at a time, beating well after each addition. If the frosting appears to separate or is very liquid after all the butter has been added, continue to beat on high speed until it is smooth and creamy, 3-5 minutes more. Add vanilla extract and beat until combined, scraping down the sides of the bowl as needed.

Minggu, 27 Maret 2011

Jacket for the cutest little girl

I know this girl...she's the most adorable little thing ever. She is the kind that makes you wish you had small kids again. When I learned she was going to turn 3 in April, my first thought was that I wanted to make her a special birthday cake.  But of course, I wanted to give her some other present apart from the cake and when I found this pattern on Etsy, I knew this was going to be what I would be making for her.

My first try was supposed to be some sort of practice jacket, using only remnants and other materials that I already had in my stash but it turned out beautifully that I would say, it's more than good enough to be a gift.

Pink polar fleece lined with a floral Japanese cotton fabric.  Perfect for the coming winter!

Heart applique with fabric matching the lining


I ditched the ribbons (as with the original design) and instead, added a couple of heart appliques to match the lining.  The jacket is no longer reversible but that's perfectly ok.  It all came together very easily.  The only tricky part was sewing the outer sleeve to its lining along its small opening.  It took me a while to figure out how to correctly do it.  Overall, I would highly recommend the pattern to anyone wanting to make something like this.

Now, I'm thinking of making another one.  Or should I do one with a hood this time?

Jumat, 11 Maret 2011

Baking burnout

I baked and decorated 4 cakes and 48 cupcakes in a span of four days and I am feeling absolutely exhausted.  I love what I do but it does take its toll on me when it's this hectic.   I only took pictures of two of the cakes cause the others weren't anything out of the ordinary.

For a 37th wedding anniversary.  It's mocha chiffon filled with caramel custard and frosted with Swiss Meringue Buttercream.

Close-up gumpaste roses.  I love using embossing sticks to make designs on my topper.

A beyblade-themed 7th birthday cake.  Again, it's mocha chiffon (as requested by the celebrant's dad), filled and frosted with Swiss Meringue buttercream.

My kids don't own any beyblades so I just kinda invented my own.  They're not that great though.
I am earning a fair bit with this homebaking thing but honestly, I am not really after the money.  Every cent actually goes to loved ones back home who need the money more.  I am not saying this to brag or to give credit to myself.  All these cake orders are but blessings for which I am really grateful.  To have an unselfish purpose simply gives more meaning to all the hard work.  At the end of the day, after all the measuring, mixing, baking, washing, and decorating, I rest knowing that I am doing a good thing and this truly gives me great joy in my heart.  What better reward is there?

So...inspite of the burnout....I am more than welcoming new baking opportunities.  Keep them coming!

Sabtu, 05 Maret 2011

My First "Wedding" Cake

The reason for the " " is because the cake is not actually for a wedding. It is for a marriage enrichment program culminating in a renewal of vows. It is, in fact, not just for one couple but for 40.

I was given just a week to think about how to go about doing this cake. I've never done a wedding cake before so the apprehension was definitely there. When I was given a rather small budget, my first thought was it was enough to make a decent two-tiered cake. Clearly, I was so clueless as to how much wedding cakes cost! When I saw this and this, I knew my cake was going to be a huge bargain.

But as my son aptly put it, even if I wasn't going to get paid for this, I'd still give it my all. True. So here it is...just finished it early this morning...my first ever two-tiered wedding cake!


The top tier is an 8" chocolate chiffon and the bottom tier is an 11" mocha chiffon. The cakes are filled and frosted with Magnolia Bakery's creamy vanilla frosting. All the decorations were made from gumpaste.

I got the idea of the bride and groom topper from a Carol Deacon book. I borrowed the book from the library months ago and photocopied some of the pages that I thought might come in handy for me in the future. I really had a blast making this topper!

So that's it for another new thing for me. Would I want to do this again? Certainly! The experience caused me a bit of anxiety but it was all worth it in the end.

You all know that I am just a self-taught homebaker, right? I've never attended any baking class whatsoever. So...if I can create something like this from scratch, all of you out there with dreams of making and selling beautiful cakes from your own home kitchen, can do so too. Go ahead and chase your dream!